Sunday, February 22, 2009
Monday, February 2, 2009
Lessons learned... well so far anyway.
I thought I would jot down a few things I learned on this project. If you can't get to sleep at night then read this. It should cure insomnia.
The lessons learned are not necessarily in any order which means you have to read the lot. :-)
1. It does not take a genius to build a kayak. I am living proof. I have never, before now, built a boat of any sort. Nor did I start with any tools except an electric drill. Had to buy a few things though. Will cover that later.
2. It helps to have been a draughtsman, in a previous life. Or at least be able to interpret drawings and an offset table. If you but plans you may be lucky enough to get them with the profiles drawn to a 1:1 scale. If not then you will have to draw the profiles yourself from measurements on the offset table. This is not hard but if you are unsure then ask someone who has done it before.
3. If possible, find someone who has done it before. It is good to have someone to call to ask about terminology. I made a couple of clangers because I had just no idea what I didn't know.
4. Find out how to use a Strongback. I didn't. While it all seems obvious to me now, it wasn't when I started. Bolt the profiles to the strongback to give you a firm base from which to lay the gunwales and chines. Best would be to find someone in the process of building and have a look at how they use the strongback. BTW. I built mine from two 200x50 plywood beams. Consequently it is strong and very straight and will not go out of alignment. Keep your strongback if at all possible. You WILL built another kayak and you will therefore use it again.
5. Duct take has it's uses but holding profiles in place on the strongback is not one of them. DOH. :-)
6. Except for placing the gunwales, I built the rest of the kayak without help. That is not to say you should not have help... but it can be done.
7. It is best to build indoors ie a garage. However if you do not have one then build it outside. :-) I did.
8. Pine is fine for keelson, gunwales, chines and stringers. Perhaps Ceder would be lighter and less likely to rot if the kayak was subject to long periods in the weather.
8a. Use 19mm ply (7 ply) for the profiles. This is a little thicker that some folks recommend but gives much better surface area for the chines, and requires slightly less accuracy for drilling (see 10b.)
9. Check out the price of Ceder anyway. It may not be that expensive, compared to pine. However it is hard to get any Ceder over 4.8m long (unless perhaps you live in Auckland or the US).
10. I used Gorilla Glue to glue up the chines etc to the profiles. I also screwed every joint just in case the glue fails. Although "water proof" some of the more experienced blokes suggest it is, at best, water resistant and will break down in time. Having said that, Gorilla Glue was easy to administer. I used one tube for the kayak.
10a. Screw each joint. it holds the joint in place while the glue sews and adds extra strength to the joint.
10b. Drill each hole that you screw. Drill about 3/4 the depth of the screw including into the plywood profile. If you don't then you may fine the plywood splits a little.
11. Put the cap on the Gorilla Glue when not in use, even between each squirt. I found that out, about 2/3 ways through the tube. :-) Once I got into the cap putting on practice I found that the glue was very easy to use even after days of non use.
12. It was suggested, and I did, coat all the Gorilla Glue joints with epoxy resin. This waterproofed the joints.
13. I used a product called "CD50" as a timber preservative on the pine. There was some concern that this would stain the polyester fabric. It did, in places. This would be a problem if you want to keep the fabric white, even after urethane coating (which might yellow it anyway). I was going for a tan colour and the staining did not show through, after a couple of coats of urethane. I am not sure about the worth of the CD50 but felt better for having applied it anyway.
14. Use a jigsaw to cut the profiles. However cut accuracy is useful to ensure a tight but comfortable fit of the chines and stringers. However you might get a better result using a tenon saw and chisel to cut out the chine notches in the profiles.
15. Learn how to cut the gunwales so that they join nicely to the keelson at the bow (there is a name for this type of joint... which I have forgotten). I made a real mess of it. Nothing that could not be fixed with glue and screws and hidden under the skin but.... ugh... it was ugly.
16. Add what you want to add on the inside of your kayak, before you skin it. It is a lot easier that way. Some suggestions include, flotation devices, foot pedals, seating, internal decking for seating and storage areas.
16a. Add floatation devices before skinning unless you intend to only use air bags. I used Polystyrene blocks. There is some suggestion that they are not a good long term solution but I am OK with them so far. Other alternatives include:
- Closed cell rubber, especially if you can get a lot, cheap.
- Empty wine bladders from 3 litre chateau le cardboard.
- Empty 2 litre plastic Coke (or any brand you like) bottles.
- Airbags (you can buy these).
The point is this. The main purpose of the floatation device is to exclude water from the kayak should you turn it upside down. If you exclude water then it become hard to sink. The secondary purpose is to have some part of the kayak stay on the surface, should the craft break up at sea (say you got run over by a British nuclear powered submarine.)
17. If you do add fittings on the inside, think about how you might get them out again (or replace them) after the skin is on. Your only access will be through the cockpit.
18. I used 8.5 oz Ripstop Polyester which came in a 1.9 metre wide bolt, purchased from Hollingsworth Agencies Ltd in Auckland (09 835 2910). However the Baidarka (well... my version of it anyway) is 1.3m circumference, at the widest point. This means you can use a 1.5m wide fabric which opens up your options considerably, particularly if you want to use nylon instead of polyester. I also talk to Tony from Haralds in Christchurch. He is a wind surfer etc who knows his fabrics. You can talk to him on 03 338 7700.
It is a very demonstration, which I followed, about how to skin the kayak. He used nylon but other than that, it is applicable.
Also have a look at this http://nz.youtube.com/watch?v=gYyvIExWkqU&feature=related I am not sure but this looks like a nylon skin with a 2 pot finish over the top.
20. I used a Hi Build sanding sealer as the first coat on the Polyester cuz someone said I should. I think it was a good move as fabric sealer. However I also think you could substitute for just another coat of polyurethane.
21. Sew on the coaming before coating the fabric. This may sound like a no brainer but I tried to do it the other way and it was a disaster. My idea was to get a good sealer coat on the polyester prior to it getting hidden behind the coaming. But, once coated, the polyester became very hard to work with. Better to sew the whole caboodle up and slap a lot of polyester around the fabric from the inside.
22. Support the coaming halfway along it's side. The reason is that you push on the side of the coaming during both entry and exit and extra support means you are less likely to break or crack the coaming. I made a little wooden bracket for this purpose.
23. Build the coaming so as to fit a 'standard' sized spray skirt. Your call but it does make the kayak a little more interchangeable.
24. Make the coaming big enough to get in and out of. The Inuit were not big people, some of us are. :-). If you are upside down under water and unable to roll up then ease of exit is essential.
25. Allow time for the polyurethane to dry between coats. "DOH" you say. But the kayak is quick to coat and you just feel like putting a couple on each day. Best to have a coffee instead and wait.
26. The polyurethane (well, mine anyway) did not come out glassy smooth. It has a very slight bobbly texture time there was a smattering of fine sand in the coating. Don't worry, it still goes like a rocket. However, I think in time, a new coat will come out smoother. Perhaps a light sand between coats may help. I did not try.
27. The design does lend itself to adding a rudder as a clip on to the stern, with wire guides running up the rear deck and through the coaming to foot peddles. I have not done this.
28. As an alternative you could clip on a temporary skeg simply with a elastic strap and a decent hunk of Velcro.
29. Or you could just epoxy on a skeg once you had finished the polyurethane coatings.
30. Either way, the kayak could do with a skeg when in windy conditions or running with the sea.
31. Learn to paddle. This may seem a little obvious but my technique was... lousy and I have paid for that with a bout of tendinitis in my left wrist. Paddling, if seems is not a matter of brute force and tight grip. No. It is all about body movement, using your torso to provide strength and holding the paddle like you would a tea cup. Toodle pip and all that.
32. Fall out. I did. The kayak, with the buoyancy I added as mentioned in 16a, stayed on the surface and when I righted it there was only about 25mm water in the bottom. A few heaves on the pump and it was free of water.
33. Add a wear strip to the keelson and first chines. This could be:
- a thin strip of epoxy, perhaps with glass fibre..
- a thin strip of timber epoxied on.
- A few more coats of polyurethane.
- PVC electrical tape.
Either way, you will feel a lot more comfortable running the kayak up the beach when surfing in, if the fabric over the keelson is protected.
34. You need to add deck lines, even if just for holding your spear paddle. Best to sew in fixtures for holding the lines, before starting the coating process. I think it would be possible to even add water proof recessed fittings made from 32mm drainage pipe caps. I did not do so thinking that I could glue the on later. Gluing sort of works but in the end I think only an epoxy will be strong and waterproof enough.
35. Just enjoy this kayak. It is a thing of beauty and fun. There is huge pleasure in building it. Even more paddling among the hoards of plastic fantastics. They sure look cute but they are not made with your blood, sweet and tears.
36. And don't worry about perfection. Worry about that in your next build. These kayaks will last 10, perhaps 15 years. That's enough. :-) So don't get too frantic.
37. Lastly (perhaps) this has been a great project, with a great outcome, for a fraction of the cost of a new plastic thing and still half the cost of the second hand plastic tub. And it floats... and floats very well.
Take care.
Sunday, February 1, 2009
Just spent two days on the water

Okains Bay, is a fabulous place. Mary's great great grandmother (I think that is the right amount of greats) lived there from about 1852 or 3 till after the turn of the century. This Carolina Henrietta Bathurst, had 11 children to a bloke called William Coffin. We have a photo of her is an older woman. Tough little wiry one she was.
Anyway, the bay is just beautiful. It is a wide bay, about 1.25 km across its, entrance. It has a very gentle sandy beach it the end and cliffs around the rest. at sea level there are many caves resplendent with wildlife like seals and birds. At the entrance to the bay I saw dolphins gliding by, though none stopped to play. The entrance to the bay is guarded by huge cliffs and rock pinnacles that jut out of the sea. Even on a calm day it is rugged and majestic. On a rough day it would be darn right treacherous. The hills behind the cliff a brown and dry, covered with whispers of grass and a few scattered sheep, eeking out their existence. At the head of the bay, just behind the beach, is a camping ground, situated under a grove of pine trees. Apart from the fear of being conked by a falling pine cone in the middle of the night, it was a great place to stay.
Anyway... back to the kayak. It does seep a little water though I am convinced that most of the water came from my wet socks (on getting into the kayak) and through the spray skirt. Even after 2 hours on the water, and punching out through surf, there was only about half a cup of water.
Punching out through surf is exactly that. You tend to go through the surf rather than over it, due to the design of the bow. However it has a high degree of buoyancy and lifted well. Having said that, the surf was small. I have no idea how it would perform in heavy surf conditions. the kayak also felt light on the water when in wind created chop out at sea. It could take extra weight and a skeg.
I have a lot of people interested in the build including some who have been following this blog and were interested in what the final product looked like. I appreciated the nice things people said... and their discretion. :-)
I have no photos sorry but I hope to post some that other might have taken.
Having said all of that I learnt a few things.
1. This is not really going to be a touring craft. While I did carry a small day bag with emergency supplies, it would have been hard to also pack a sleeping bag, sleeping roll, tent and food enough for 2 nights.
2. I didn't participate in the sea rescue practice as i think the kayak will fill rapidly with water and, while still able to float, will look like a alligator, on the surface. I was very impressed by the buoyancy of the plastic kayaks that appeared to take on very little water on capsize. I will practice self rescues the next time I go to a sheltered harbour when I can assess the amount of floatation I have, while still standing. :-)
3. As with 2 above, I need to make sure I can self rescue and roll the kayak. I have it clear in my head, how to do this but I would still like an able bodied person handy just in case I get it wrong, in the water.
4. The sea kayaking network are a bunch of helpful friendly people. :-)
The kayak is now washed down. I will try a few experiments tomorrow.
1. I am going to try seeing if electrical tape will hold better to the polyurethane than duct tape.
2. I am going to try both the electrical tape and duct tape on both a glossy surface and lightly sanded surface.
3. I am going to give the hull a further coat of polyurethane to seal any seepage points that may have opened over the weekend.
:-)
That all.
:-)
Monday, January 26, 2009
Day... whatever... I think 21
It floats. :-)
 Not too heavy. My guess is that it is about 20kg but I could be out by 5kg either way.
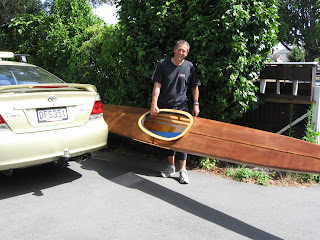 Showing off.
 And on to the roof racks. This needed to be a one man job and thankfully it is.
 Nice legs!!!!!!
 The launching. I am underway. Good shot of the greenland paddle.
 and onto the briny.
 This kayak can go. :-)
 and turn.
 Coming back from a quick trip up the estuary. I went as far as the point, in the distance.
There is proof below. Tonight, just at dusk, we found some sheltered water and a beach to launch from. It paddles just fine. Anyway, I a getting ahead of myself.
Over the last 3 or so days I have been busy, mainly making a paddle. The greenland style paddle is just so easy to make even with a modicum of tools, it is a wonder why I made such a hash of my first one. But I did. And I made a complete mess of an innocent piece of ceder. I wont make that mistake again.
My idea was sound enough. Laminate three pieces of ceder together to increase the strength of the paddle and decrease the chance of a single point failure. Had I executed it, as I dreamt, then all would have been fine and dandy. However I made a major mistake with my choice of glue. I used a thing called "Super Grip", a polyurethane glue that is supposed to be 100% water proof. The problem I had was that the glue was faulty in that on opening I found that it had formed a hard crust inside the tube. I should have stopped there. But no, I broke the had crust with a nail and proceeded to try to gun the rest of the glue out. But it was very thick, would not spread easily, when almost immediately lumpy on spreading and was very hard to work with. As a consequence the timbers bonded, but with a huge gap (partly filled with glue, partly just air.) I didn't take photos cuz I was to embarrassed. Cutting out and planing down were also a but trying. However, after much machining I ended up with something like a greenland paddle.
I have also been experimenting with how to add decklines without creating any holes in the skin. I have decided that I will make all decklines and their holders from nylon or polyester rope, The holders will be glued to backing sheets of pre-painted polyester cloth, which in turn, will be glued to the skin. My 'experiments' indicate that this will work, and it it doesn't then I can still go to Plan B. It will look a little ugly but then I look a bit ugly as well, so matters little.
Bought a spray skirt - Rasdek Rhino. I had built the coaming to the pattern that the Rasdek people had given me and wowowowoow, it fitted very well.
Also bought roof racks for the car. Danged expensive but it is hard to transport a kayak without them. I didn't buy a kayak holder preferring to rope the kayak onto the roof racks. It worked very well.
Then I got it in the water. The kayak feels just fabulous to paddle. I have not the experience to know if it is fast or slow, but it is definitely responsive. It has no rudder or skeg but tracks well. Mind you, the only thing I was battling was a fast tidal current.
I was out on the water for about 25 minutes. Over that time I noticed no appreciable water on the inside, which was nice. I did notice a damp feel to the skin however but am unsure it that is seepage or like a condensation. There was no running water inside.
I am absolutely delighted with this whole project. It took 21 days from building the strongback to sitting on the water. I could be wrong but I am thinking that I could, just with better organisation, get that down to 10 days. ummmmmmmm. :-)
 Not too heavy. My guess is that it is about 20kg but I could be out by 5kg either way.
 Showing off.
 And on to the roof racks. This needed to be a one man job and thankfully it is.
 Nice legs!!!!!!
 The launching. I am underway. Good shot of the greenland paddle.
 and onto the briny.
 This kayak can go. :-)
 and turn.
 Coming back from a quick trip up the estuary. I went as far as the point, in the distance.
Friday, January 23, 2009
day 19... I think
I haven't posted for a few days and lost count of the days. The fact is that most of the progress over the last few days has focused on painting... mainly.
So, after the customary trip to Bunnings, and much deliberation, I ended up with the following.
Wattyl Hi Build Sanding Sealer
Wattyl Estapol - Exterior Clear
Wattyl Colourwood Pigmented Stain - colour Kauri
I applied the Hi Build Sanding Sealer first. This is a clear coat and my hope is that seals the fabric effectively.
2nd was a coat of the Exterior Clear. This has a light transparent yellowish finish, so it is easy to see where it has been applied.
3rd was a coat of Exterior Clear but with some kauri stain added.
4th coat as as the 3rd.
It has been very hot down here so I applied the coats only after about 8 hours. Perhaps it is a mistake. I am leaving the kayak to totally dry now and may apply one more coat of Exterior Clear. However I may also leave it for about a week to let it totally settle.
In terms of coverage.
1 Litre of Hi Build sanding sealer was not quite enough to complete one coat of the Kayak. If I had thinned it to the 10% allowed, perhaps it might have go the whole way.
I lightly sanded (240 grit) the Hi Build sealer before applying the Exterior Clear.
The first coat of Exterior clear took 2/3 litre.
The second took about 1/2 litre.
The third took about 1/2 litre.
While there was some evidence of the CD50 (the timber preservative I used) seeping through the raw fabric, it does not show after the stain and coatings. The finish i have got is exactly what i was aiming for, a mid tan, old weathered look which, at a distance, could be mistaken for timber.
:-)
I really screwed up the installation of the coaming, a mistake I wont repeat. However, it is on. However, as a result, the skin is not as tight as I would like, at the mid section. I am not concerned, just a bit annoyed that I got it wrong.
Now, all I need to do is build a greenland paddle, buy a roof rack, buy the spray skirt and buy a buoyancy vest, and I am in business.
Also working on a plan for adding deck lines etc but will not worry about this till after the first sea trials. need to see if it floats first.
 Out the window
 And back into the open air.
 This is what I used.... plus a $1 paint brush
 First coat of Hi Build sealer on.
 First coat of Exterior Clear on. Note the yellow tinge.
 Exterior Clear with stain pigment added.
 This was after the 4 coat. It is starting to get a nice shine. the surface is sort of rough (not glassy smooth). I may give it a sand (light one with 240 grit) and coat of clear in about a week.
 Another view. This one carefully does not show the mess I made installing the coaming.
 It is getting a nice shine and the fabric remains tort.
Monday, January 19, 2009
Day 14
Day 14, Sunday 18th January 2009.
 The seam is pinned up and ready for the final sewing. Not sure of the name of the stitch I will be using but essentially it hides itself leaving (so long as you close your eyes) a nice, neat, single raised material mound down the centre of the kayak. This shot shows how the fabric folds around the stern area.

I finished sewing the main seams. Sounded simple but it took about 5 hours. However the result was fantastic as perhaps you can see in the photos. Also did another coat of epoxy resin on the coaming pieces so they will be ready for assembly on Tuesday.
Had a request for the recipe for the carrot cake I fed the Jade team on my last day. I have to find it first but when I do I will post it here... on this blog. It is a great cake. :-)
 The seam is pinned up and ready for the final sewing. Not sure of the name of the stitch I will be using but essentially it hides itself leaving (so long as you close your eyes) a nice, neat, single raised material mound down the centre of the kayak. This shot shows how the fabric folds around the stern area.
All done. Now just need to add the coaming and sew it in then it will be time to paint it.
Sunday, January 18, 2009
Day 13
Hi team. Just a shortie tonight. Finished the sewing of the main seam both fore and aft and have pinned it ready for cleaning up with a whip stitch. The fabric stayed tort overnight which bodes well for when i put the polysomething on and it shrinks a little more (I hope). Also cleaned up the coaming pieces and gave them a coat of resin. They will get a sand tomorrow and one more coat. Then they will be assembled on to the frame and the polysomething applied. Bingo. I am picking Tuesday (weather permitting) will be paint day.
I know, I know. I am a few days late but I am enjoying this too much. :-)
 The main seam is finished. Still needs to be tidied up but that should be easy. I just love the look of the kayak. It is very straight and clean looking.
 I thought the stern would be a problem but the fabric just folded over cleanly.
 Another look. :-)
 And upside down. The fabric has added a bit of weight but it is still able to be carried with one hand.
 The coaming pieces ready for a coating with epoxy resin.
Need to start thinking about making the paddle. But need to think about the dentist first.
 The main seam is finished. Still needs to be tidied up but that should be easy. I just love the look of the kayak. It is very straight and clean looking.
  I thought the stern would be a problem but the fabric just folded over cleanly.
 Another look. :-)
 And upside down. The fabric has added a bit of weight but it is still able to be carried with one hand.
 The coaming pieces ready for a coating with epoxy resin.
Subscribe to:
Posts (Atom)
